Tuesday, January 26, 2010

Realsynch flash

I'll state from the beginning : This will only work with a Nikon D40 , D50 or D70/S since they do not have a focal plane shutter , instead the sensor fires electronically which gives it the advantage of capturing the whole flash in one go as opposed to a slit moving across the frame as with Focal Plane [FP] shuters .


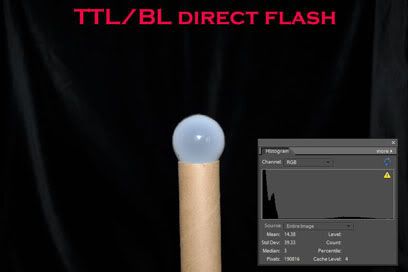
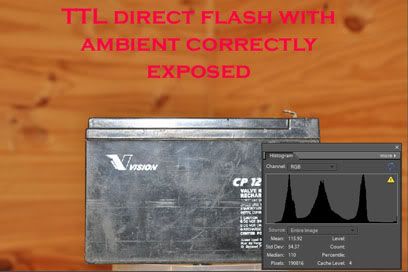
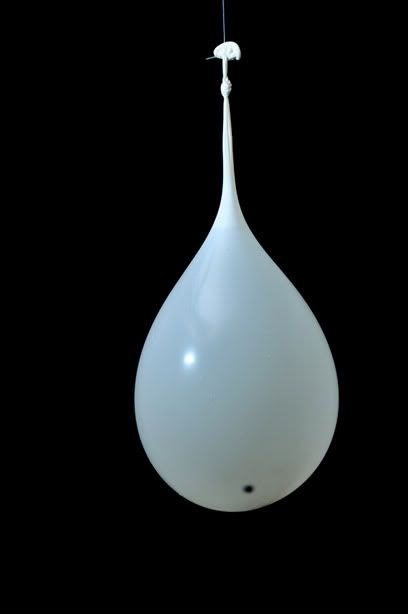
First off two samples to whet your appetite comparing what I call "realsynch" to the high-FP trick mode that modern cameras use in bright sunshine with high shutter speeds .
This is the best a Nikon D90 and SB800 can do at a distance of 5 metres ....
taken indoors at night .


Photobucket


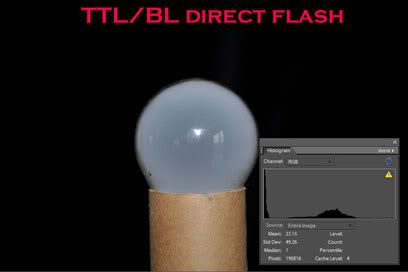
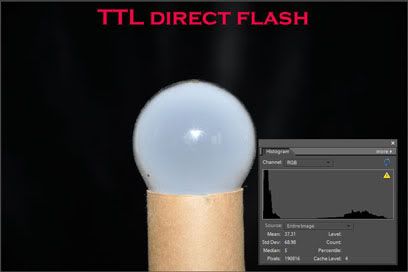
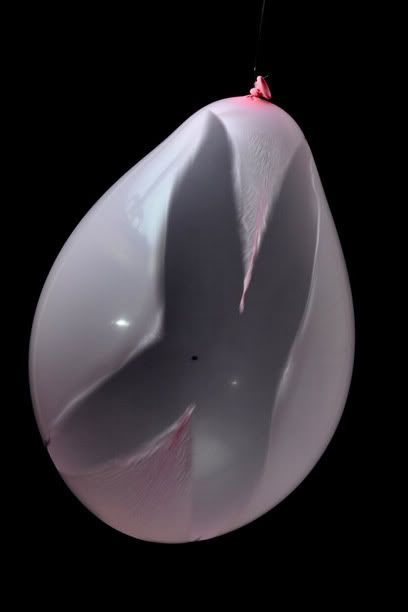
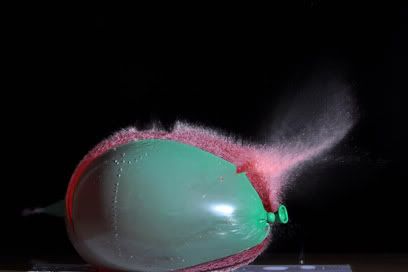
And this is what "realsynch" does ....


Photobucket


I used a modified SB24 flash for my "realsynch" flash . Because the cameras mentioned fire electronically with their sensors they have a 1/500th flash synch speed meaning that since the SB800 , for example , fires at full power for around 1/1000th of a second the camera will be able to capture that entire flash in 1/500th of a second without any overlap in the timing of the electronics .
With a D90 this time is only 1/200th of a second and after that it changes to FP mode where the shutter slides across the frame in a slit - then it has to resort to a weak continuous light so the whole frame receives the same amount of light .... more on that later .


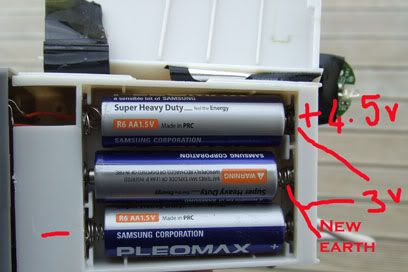
First we have to make sure the D40/50/70/S we are using doesn't know there is a flash connected and there are two options , either slide a piece of paper under the two back pins as you slide the flash into the hotshoe or do what I did - open the base of the flash and cut the two wires to the back two pins -BUT : be careful of high voltages , you could get zapped !
Now if you have an SB600/800/900 the paper trick is the safest if you are not 100% sure of what you are doing , also you don't want to damage a newer flash .
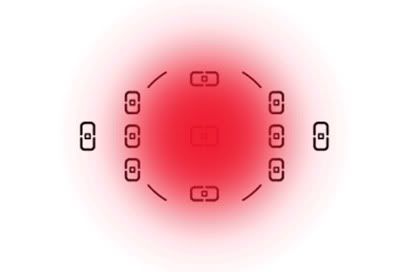
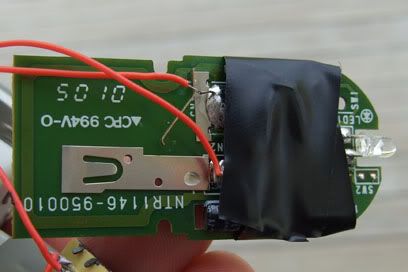
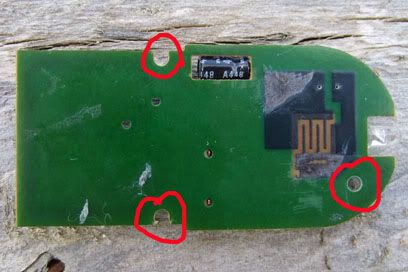
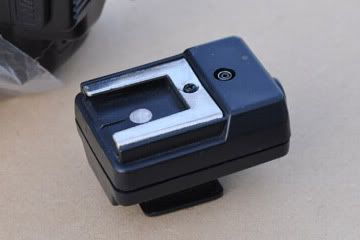
And this is a picture I took a while back to show the flash pins .


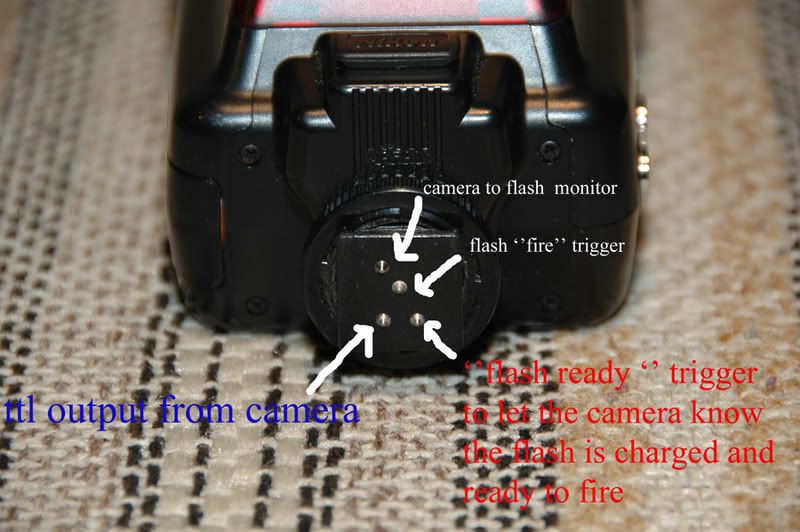
The centre pin gets earthed to the 'ground' contact on the side of the hotshoe when the camera wants it to fire . The single pin at the top is the 'camera to flash' communication pin .
The two at the bottom are for the flash to communicate with the camera so I disconnect them so the camera doesn't know the flash is connected and can't default to maximum synch speed .
In any case it doesn't speak the same language as the newer cameras so I have found that with my D40 and D50 I can fit an older flash without bypassing or blocking any of the pins and it still works at any speed , however I can't guarantee that there won't be any mis-communication between the camera and flash so I generally use my SB24 with the wires cut ....
I leave the one at the top connected because it is useful in that you can switch the SB24 to "standby " mode and when the camera is switched on that pin wakes the flash up - so the flash knows a camera is connected but the camera doesn't know a flash is connected !
Of course this means you have to input the aperture , iso and zoom of the head manually - but you can still leave the flash in 'auto' mode and it will use its sensor to control the flash output accordingly - based on the settings you have told it to use .
The advantage ? Well you can see that from the two pictures at the top !
If we go by the 'sunny 16' rule : Bright sunlight at F16 gives you iso 200 and 1/200th max for the D90 . The SB800 tells me I have 2.7 metres working distance at this setting but when I open the aperture - F8 1/800th , F4 1/3200th ... the flash has to go to high fp mode and tells me I have 1.4 metres working distance .
Now the SB24 : F16 on the D50 allows me 1/500th sec at iso 500 , full power - which gives me 4 metres . f8 iso 200 1/800th full power is cutting it a bit fine to prevent overlap but as we drop in flash power it fires much faster . At 1/4 power it fires at 1/2700th sec and at 1/8 it fires at 1/5500th sec so at F4 1/3200th and iso 200 I can leave it on 1/4 and still catch a high percentage of the flash and have 4 metres working distance .
These distances are at 24mm wide angle on the zoom head and increase [ on both flashes ] as I zoom in and the power used would be enough to light a subject in total darkness as shown by the first two pictures . Of course outside in bright sunlight we would not need all that power and could use the flash as fill only , bounce it off a reflector , or close the aperture without changing the settings on the flash thereby fooling the flash to think it doesn't need to fire so strong [ increasing the iso setting on the flash will also reduce its power ] .
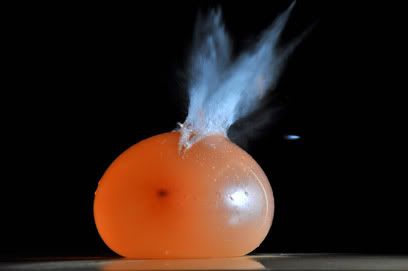
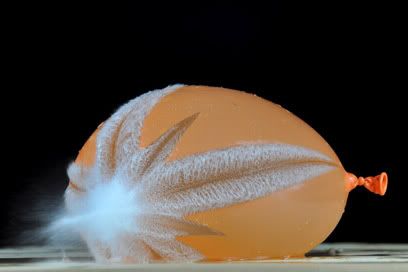
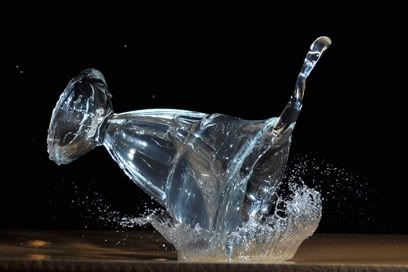
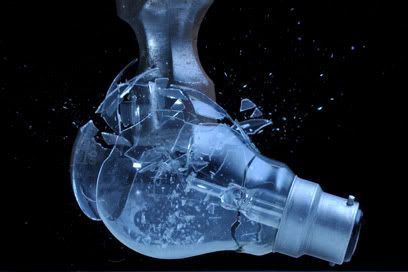
Here are two more pictures illustrating the power you have outside in bright sunlight .
Just remember one thing though , you have so much power available you may need to make sure you don't get too close to your subject/s since the flash may not be able to fire weak enough !


Photobucket
Photobucket


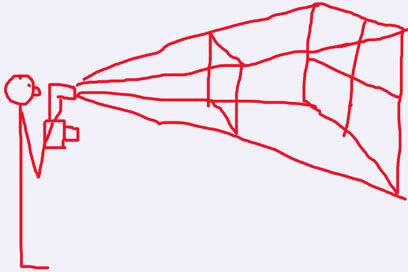
Now the 'rough' maths . Due to the inverse square law when you are twice as far from the subject - the light from the flash going forward in a 'rectangular' pattern means that the length and breadth of that 'rectangle' double and twice the length times twice the breadth = 4 times the area . So if you are getting twice the working distance it actually means you have 4 times the flash power ! The results may not agree 100% with the maths but they look close enough to prove that there is a huge advantage in 'realsynch' compared to high-fp mode .
So if the SB800 tells me I have 1.4 metres working distance and the SB24 tells me I have 4 metres then 4/1.4 = 2.85 X the working distance . 2.85 squared gives just over 8X the power !
That's 3 stops more powerful than a D90 and SB800 combination achieved with a lowly D40 and SB24 flash !
After doing some tests in manual mode without flash to get the same histograms as the first pictures [ not 100% but close ] it appears I am getting 2 1/3 to 2 2/3 stops more power than high fp mode .
I just did some calculations on the difference between normal flash and High fp on the SB800 , hopefully they are correct ;
When I set my camera manually to iso 200 , F16 and 1/200th sec the flash tells me I have 0.6-2.7 metres working distance available . As I take it to F8 1/800th or F4 1/3200th it goes into high-fp mode and tells me I have 0.6-1.4 metres . Now 2.7m/1.4m gives us 1.928X the distance . 1.928 squared tells us we have 3.72X the flash power when we are not in high-fp mode .
1/3.72 = 0.2688 which is the power we have in fp mode compared to normal flash mode .
That's less than 27% of normal flash power with a D90 and SB800 flash , when in high-fp mode .
At iso 100 and 35mm the SB800 has a GN of 38m and the SB24 a GN of 36m . By my calculations the SB24 has less than 90% of the power of a SB800 .
But when we start comparing "realsynch" to high fp mode the SB24/D40 combination has almost 8X more power at higher shutter speeds due to the faster flash synch speed !


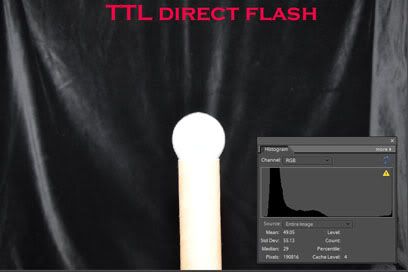
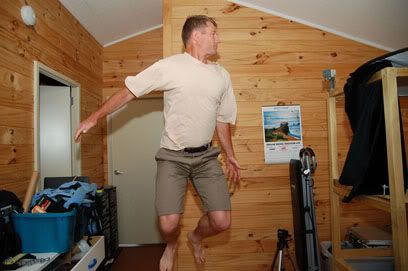
Today I did some tests to try to turn "day into night " .
First a picture without flash .
Photobucket


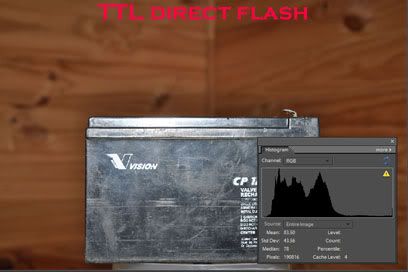
Under expose the background by increasing the shutter speed ...
Photobucket


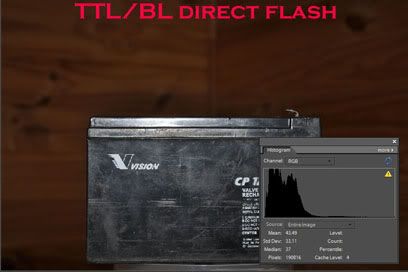
And with the D40 , [35mm 1.8 lens] and SB 24 we still have enough power at 4 meters to make the picture look like a bad 'direct flash' shot at night !


Photobucket

Direct flash and TTL/BL

Recently I was involved in a discussion regarding the advantage of distance info when using TTL/BL and direct flash .
Anyway I decided to try to explain this in an uninterrupted logical manner for those who are interested in the subject .
Ideally we avoid direct flash but there are times when we have no choice . Outdoors in daylight is a good example with nothing to bounce off and when we only want subtle fill-flash as well .
First we need to understand how they meter :
TTL doesn't care how well you have the ambient exposed , it simply tries to get an average grey in the centre of the frame ......


TTL/BL on the other hand is more complicated , when the flash head is pointing forward it meters quite heavily toward the distance info from the lens as well as using a different pattern to meter from , it uses the " focus point diamond '' and can select a smaller area from anywhere inside that pattern ......


With direct flash though it only uses a small portion of the pre-flash reading from this pattern .
On to the tests . First we have TTL/BL , I've underexposed the background in these pictures so we only have the flash lighting the scene .


With the advantage of distance info TTL/BL does a pretty good job of maintaining a consistent exposure for the subject regardless of its size in the frame - now TTL flash .


As you can see TTL doesn't know the distance , all it knows is that it wants an average grey in the centre of the frame and to illustrate this I took both of these images and applied an 'average blur' in photoshop in the centre of the frame .....

When the subject is central and fills a decent percentage of the centre of the frame it's not bad ....


But when the subject is smaller and far from the background TTL has to make that small subject really bright to get and average grey in the centre of the frame , TTL/BL does not suffer from this weakness since it knows how far away the subject is [ with direct flash only ! ]


Now we take a darker subject with a lighter background , some may say TTL flash looks better here ....


In reality TTL has fired stronger because the subject does not fill the frame and is black so it's trying to make it an average grey . The result may be more pleasing to the eyes for some but essentially the problem is not with TTL/BL flash in this case . When you are using direct flash and want to light the subject correctly you can't expect the flash to light the background correctly as well as the subject and be accurate in both cases ,though , with TTL flash , there will be the odd occasion where the results will look good with the right combination of subject colour , size , and distance from the background which is pure luck .

So the problem is not the 'car' but the 'nut that holds the steering wheel ' .
If you are using direct flash you have to make sure you expose the ambient correctly - so that is what I have done , I adjusted the shutter speed to expose the background the way I wanted it and let the flash handle the subject - in this case TTL/BL senses that the ambient is having a greater effect on the subject and backs off accordingly .


TTL on the other hand still thinks it is the only light source and fires too strong causing more blown highlights .


The conclusion of the matter ? If you are using direct flash with TTL/BL you are concentrating on the subject at a set distance and have to expose for the background with your normal camera settings , with direct flash and TTL on the other hand it all depends on how big your subject is in the centre of the frame , the subject colour , the background colour behind the subject in the centre of the frame that it meters from , the distance form the background that is having an effect on the metering .......
I choose TTL/BL and the advantage of the distance info from the lens with direct flash .Choose whichever you want - just understand how it works . [ and shoot manual flash when possible :smile: ] .

Motion sensor remote trigger

This is the prototype of my modification of a cheap dummy camera , with built in motor and motion sensor , to trigger my camera . The video


First I started with a cheap [ $9 ] dummy security camera that moves from side to side when it detects motion to give people the impression that they are on video . It runs on 3 X AA 1.5 volt batteries which makes it 4.5 volts . { The motion sensor is pathetic so I am getting something better next week , but the same principle applies }
Since the camera remote of my Nikon runs on a 3 volt battery I removed one battery and bridged out that connection in the battery holder making it effectively also a 3 volt system and it still works on that voltage - not that I'm promising that every one you buy will be able to do that :) !


Now this is obviously very rough as it involved a fair amount of trial and error and modifications , so you could do a better job now that you know how it goes - and I will do a better job when my more advanced motion sensor arrives , and I'll share the results with you as well :) .
The basic concept is this : The dummy camera is always 'on' and when it detects motion it switches its power supply to the little motor inside which moves from side to side for about 25 seconds .
By removing one battery and bridging out the contacts of that section of the compartment you are making it a 3 volt system - I'll explain the other option further down .
You open the dummy camera , and cut the wires to the motor and take them to the battery feed of your camera remote !


In the meantime , if you want a neat job , you tape something around the remote , holding the button down [ I ended up taping some copper wire over the bare contacts after destroying the outer case of the remote :D ] ,and this means " you are always pushing the button " of the remote , and when the dummy camera supplies the power to it , it triggers the camera for about 25 seconds meaning you could have the camera in multi-shot mode or use the auto-focus option knowing it will have 25 seconds to get the auto focus right and take the shot[s] .
Imagine a hawk on the side of the road eating some road-kill . You move the 'food' to a safer location , set up the camera and motion sensor and move away - and wait for the hawk to come back and trigger the camera a few times for some cool photos .

If you are concerned that a motion sensor you are using may not work on 3 volts you could always do what auto electricians would tell you not to .... pick up an earth feed from between the batteries . The dummy camera I opened had a bunch of earth wires at one point and one of them went to the motor , along with the positive feed going to the motor . You could still use the positive feed and ignore the earth feed and instead take an 'earth' feed from behind the first battery in line , thereby using only two of the batteries for your supply to the remote .
This is not exactly healthy for the batteries because the two batteries you are using will go flat before the one you are not using for your feed but this will take a very long time and batteries are cheap enough for the results you will get . You could also measure the batteries occasionally and 'rotate them ' , swapping them around regularly .


I'll provide an update when my new door sensor arrives and hopefully will have something that works a little better in direct sunlight and has a better range .

Now , how do you get to the battery contacts without destroying the outer cover ?!
Here's a picture showing where the screws are located under the cover so you don't have to peel it off . There are three screws , this is looking from the top .....

Now you can just cut away a small section of the cover to get to the screws and open the remote and solder two wires to the battery supply - of course you don't re-fit your battery after doing this !
Hopefully I will have an update on a superior model next week !
.

Sound activated flash trigger


I have been asked to share my technique with regard to triggering a flash for 'special' pictures .
Here's the youtube video


the basics :


To trigger a flash you simply need to join the centre pin to the side 'earth' contact which is basically what the 'test' button does on a flash . The 'pc' plug on the side of the flash has these two contacts . if your flash doesn't have a 'pc' plug you can always use a cheap hotshoe adapter to make the contact for you


plug a 'pc' cord into it and take the two wires to the relay on the switching kit , connect them to pin 'com' and 'no' contacts of the relay [ 'common' and 'normally open' ] .


The picture is taken in a very dark room or at night outside , especially if you are shooting water balloons with an air rifle ! Set up the camera in manual mode, lowest iso , around F9 and two seconds exposure which gives a pitch black image if there is no additional light .
Take a few test images and adjust the distance of the flash to get correct exposure before you start destroying anything .


Then you need to trigger the flash , there are various ways to do this but in this case I bought a voice activated switch kit and modified it .


I also added a two metre length of wire to the mic so I could move it around .
It would have still worked with the original relay but there would have been a slight delay when it pulls in - I added a solid state relay for instant switching and the first images were of a balloon with a hole in it that hadn't had time to split yet !

What you need to do in a case like this is keep moving the mic further away so the sound has to travel further , until you catch the explosion at the right moment in time .

I set the camera up on a tripod [ D90 , 70-200VR lens , but any camera would do the job if it has a manual mode - even a compact ! ] , fill the balloon and place it on the table , trigger the camera with the remote and you have two seconds to fire !
The sound of the air rifle triggers the 'voice activated switch ' and the relay joins the two 'pc' wires together which fires the flash . the lowest power on an SB24 is 1/16th which fires at 1/11000th sec and for some shots I used the Sb800 at 1/128th power which gave me 1/41600th sec .
That's the pellet behind the balloon , at 1/11000th sec .


Someone sugested I try safety goggles so I said "ok"


You could add food colouring


And of course not every country allows the use of air rifles and you don't all live on a farm like I do so you could just put the mic on a table and drop a glass of water or something to trigger the flash ...


These are just a few of the things I tried , you can photograph anything that makes a sound that will trigger the flash - how about setting your SB800 to 100hz repeating flash and dropping a golf ball .... it needs some work still but shows one of the many other possibilites for sound activated flash pictures !


Friday 2 /10/2009 update .....................

Also see "Stop motion photography"

High-fp flash


Nikon's manuals don't explain auto 'high'- fp very well - or the limitations involved .
Most cameras have a focal plane shutter

{ Except the D1 , D40 , D50 and D70[S] , they have electronically switched sensor/shutters and can do what I call 'realsynch flash' and effectively have 6X as much power with flash at maximum speed , compared to a pro body in high-fp mode } , but other cameras need high-fp mode .

At your camera's maximum synch speed [ 1/200th sec for the D90 ] the shutter opens , the flash fires , and the shutter closes , which means that the entire sensor gets the full flash .
Here's an older camera with a 1/90th sec synch speed ...


As the shutter speed increases the " first curtain " of the shutter opens and the " second curtain " starts chasing it across the screen right after it starts moving which means that a slit slides across the screen . If the flash were to fire at a higher shutter speed than the maximum synch speed you will get a partially-lit photo .....

As you can see in the above image the flash fired , it lasted about 1/10 000th sec and turned off - the slit was still in the beginning stages of its travels though and so only a slit has been lit , as the slit continues its journey with no light source the top of the image will be black .
The solution is for the flash to act as a ' continuous ' light , it fires rapidly in succession and may fire tens of thousands of times per second , and so is effectively a 'continuous ' light and behaves the same as the ambient with regard to the fact that shutter speed now controls the flash output as well as the ambient .
It would look something like this in slow motion - as the slit slides across the frame the flash keeps firing .... bzzzzzzzzzzzzzz


This is an old Canon camera so it is not exactly what the Nikon shutter would look like but it conveys the general idea . The main trade-off being that a lot of light is being wasted on the back of the partially open shutter .
To do the maths you simply need to put your SB800 on the camera and assume 'sunny 16' rule - for the brightest clearest day you could have - at iso 200 and 1/200th you would be at F16 - set it to that , it's a " worst case scenario ' for outdoor flash .
Now have a look at the working distance shown on the back of the flash with the flash head facing forward , we have :
1.) 18mm 8.8 feet .
2.) 35mm 11 feet .
3.) 105mm 17 feet .
Now when we keep the ambient exposure where it is we can assume that changing to F8 will let in 4 X as much light so we would have to go to 1/800th sec shutter speed which is high-fp mode .
This gives us :
1.) 18mm 4.6 feet
2.) 35mm 5.8 feet
3.) 105mm 8.8 feet .
The calculations :
1.) 4.6/8.8 = 0.522 X the distance .
2.) 5.8/11 = 0.527 X the distance .
3.) 8.8/17 = 0.517 X the distance .


So that means that we have just over half the working distance in each situation when we keep the ambient exposure where it is . To confirm this we can go to F4 , let in 4 X as much light , and to keep the ambient where it is we will have to go to 1/3200th sec effectively cutting that 4 X as much light in 1/4 again and negating the " advantage ' of opening the aperture .
So now the flash is behaving the same as continuous light and whatever we do , keeping the ambient correctly exposed , we will have that same working distance .
Because of the 'inverse square law' [ 2 X the distance needs 4 X the power , while 1/2 the distance only needs 1/4 the power ] .


When the subject is twice as far the lengths of the sides doubles , 2 X 2 = 4 X the area .
And of course halving the distance means you will only need 1/4 the power .


Once again it's not all that simple . The distances shown are with regard to the flash having to light the entire scene , something we don't need when we have the ambient correctly exposed .
A common setting for those who use 'fill-flash' outdoors is TTL-1.7 compensation , just to add some light to the subject without overpowering it with flash .
TTL flash doesn't know how well you have the ambient exposed and negative compensation will need to be dialed in . TTL/BL on the other hand takes the ambient exposure into account and if it detects correct exposure it will automatically dial itself back to the equivalent of TTL-1.7 in situations where they meter equally .
Many people will dial in even more negative compensation so if you had to assume an 'average' of -2 EV for the flash compensation that is two stops , or 1/4 the power that you are 'demanding' of the flash anyway so it will be able to do that at the first distance suggested by the flash head before you changed to high-fp mode .
If you were in TTL mode and went to high-fp , at105mm , and shot a subject 17 feet away [ when the flash head tells you that your limit is 8.8 feet ] the flash head will probably register -2 after firing telling you it never had enough power .
But if you have dialed in '-2' on the flash head it will be happy to light a subject 17 feet away because it can do that at '-2' :) .